

How To Upload Your Voice Recording Onto Your Computer
Sound Recorder is an app you can apply to record sound for up to three hours per recording file. You can use it adjacent with other apps, which allows you to tape audio while you continue working on your PC. (While at that place is also a desktop program called Sound Recorder, this commodity is almost the Audio Recorder app.)
-
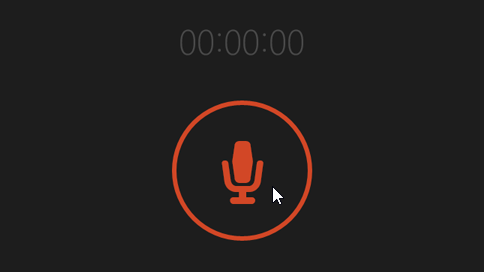
To start recording, tap or click the round button with a microphone in the center. This is your Record button.
-
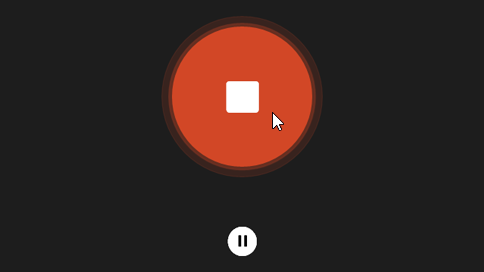
To pause recording, tap or click Pause.

-
To resume the same recording you paused, tap or click Interruption again.
-
To save the recording tap or click Cease. Y'all'll see the recording appear in your list of recordings.
(The next time you lot tap or click Record, you'll start a new recording.)
-
Tap or click the recording y'all want to rename.
-
Tap or click Rename.
-
Enter a new proper noun for your recording. Tap or click Rename.
Your recordings are stored inside the Sound Recorder app. If you uninstall the app, your recordings will be deleted. To send the recording file to someone through another app, apply the Share charm.
-
Open Audio Recorder.
-
Tap or click the recording you desire to share.
-
Swipe in from the right border of the screen, and so tap Share.
(If you're using a mouse, indicate to the upper-right corner of the screen, move the mouse pointer downward, and then click Share.) -
You'll see a list of the apps you have that tin can share. To mail your recording, tap or click Mail service and follow the instructions. To share your recording to an app, tap or click the app and follow the instructions.
You tin also send recording files as attachments right from the Mail app. Tap or click Sound Recorder from the carte when you're choosing a file to attach to an e-mail.
-
Tap or click the recording yous want to trim.
-
Tap or click Trim.
-
Drag the left and right ends of the timeline to the new start and stop points y'all desire.You tin can play the trimmed recording to brand sure it starts and stops where you want. Suit the start or stop points as needed. Tap or click OK.
-
Practice i of the post-obit:
-
If yous'd like to relieve the trimmed portion as a new recording file, tap or click Save a copy.
-
If y'all'd similar to supercede your recording with the trimmed portion, tap or click Update original.
Annotation:You tin can't trim if you have minimized Sound Recorder to take up less than 672px of width on the screen—yous'll take to make Sound Recorder larger in social club to trim.
-
Tap or click the recording you want to delete.
-
Tap or click Delete.
Audio Recorder won't go on recording in the background when you use other apps. To utilise Audio Recorder along with other apps, use them side by side.
To use Audio Recorder alongside other apps
-
Open Audio Recorder.
-
Swipe in from the meridian of the screen until an opening appears backside the app, then drag the app to the left or correct.(If yous're using a mouse, click the top of the screen and drag the app downwards until an opening appears behind it, and then drag the app to the left or right.)
-
Go dorsum to Start and open up a 2d app. It will announced next to Sound Recorder on the aforementioned screen.
-
Adjust the corporeality of your screen you would like Sound Recorder to apply by moving the bar between apps.
-
Open up Audio Recorder.
-
Swipe in from the right border of the screen, so tap Settings.
(If you're using a mouse, point to the lower-correct corner of the screen, move the mouse pointer upwardly, and so click Settings.) -
Tap or click Permissions.
-
Ready Microphone to On. You can now record.
-
Swipe in from the right edge of the screen, and so tap Search.
(If you're using a mouse, point to the upper-right corner of the screen, move the mouse arrow down, then click Search.) -
Enter Audio in the search box, so tap or click Audio.
-
Tap or click the Recording tab.
-
Tap or click Microphone, and and so tap or click Properties.
-
Tap or click the Levels tab. Utilize the sliders to adjust the volume and heave of your microphone.
-
Tap or click OK, and then tap or click OK over again to close Sound.
Source: https://support.microsoft.com/en-us/windows/sound-recorder-app-for-windows-faq-5c208478-2141-bd07-fe1d-d6d1356c1d56
Posted by: wongunwho1946.blogspot.com
0 Response to "How To Upload Your Voice Recording Onto Your Computer"
Post a Comment